
Getting started.
Welcome! Nitoku is a platorm designed to create and manage documents. Documents are managed as web pages. If you’re not a developer, don’t sweat it, you don't need to know HTML to create Nitoku's web pages, documents are created with the markdown language, an easy-to-read, easy-to-write plain text format that enable non developers to create valid web pages.
Let's get started, get familiar with the platform and explore Nitoku's features:
Try now🔗
Try Nitoku in minutes. Create your first page, your team and more by following the steps below.
1. Sign in.🔗
Start by signing in to Nitoku. If you already have an account, you can use your email or username to login. If you don't have an account yet, sign up and create a new account.
2. Add some markdown to your Home page.🔗
Nitoku's web pages are created with markdown, an easy-to-read, easy-to-write plain text format that enable non developers to create valid web pages. If you know markdown, go ahead and edit your Home page. If you don't know markdown follow this link to learn the basics of markdown, in a very short time, you will be able to create pages likes this one without the need to learn html.
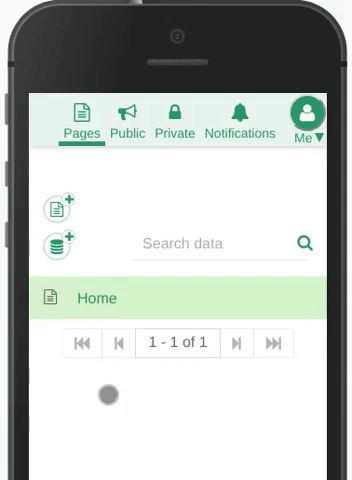
To open the page editor, first click on your Home page as shown on the image below. Then click on the edit button. The Home page is a special page that will be displayed below your table of resources, you can add any type of markdown here. I personally use this Home page as a index of the resources that I frequently access.
Follow this link if you want to learn more about editing pages.
3. Create a new page.🔗
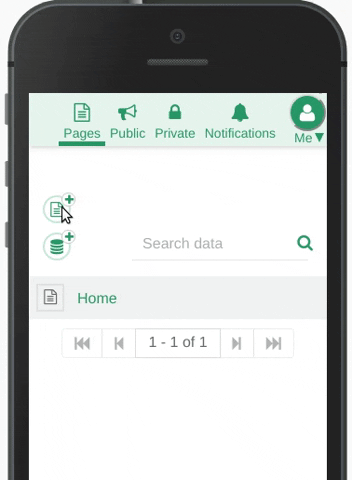
Click on the [  Add new page icon ] to create your first page. Once the page has been created, it will be added to your table of pages. You can now open the page by clicking on the page name and edit it as needed.
4. Upload a file🔗
Sometimes you would like to add a file to your pages, e.g a pdf file or an image. The upload of files into your data resources is managed by "File manager blocks".
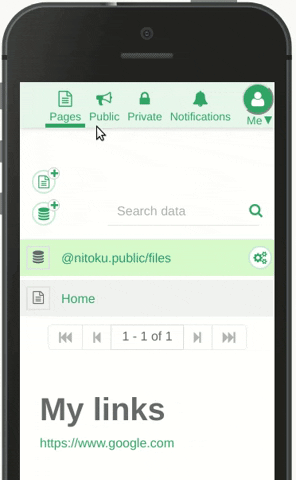
Click on the [  Add file manager icon ], as you can see on the image below, the dialog will request you to input the address of the file manager that you wish to use, by default the address is set to @nitoku.public/files, this is the default file manager provided by Nitoku. We will use this file manager, go ahead and click the "Add file manager button". The file manager will be added to your resources, you can now open the file manager and upload the resources that you may need.
Please note that you are not restricted to use @nitoku.public/files file manager, if you are a programmer, as an alternative you can copy the open source code of @nitoku.public/files, customize it and create your own file manager. Then, to use it, input the address of your newly created file manager instead of the default @nitoku.public/files. You can find more information about blocks and file managers here.
5. Enhance your content with blocks.🔗
Standard markdown provides only text and easy formatting, therefore editing a web page using only markdown will limit the types of pages that you can create. Nitoku provides three methods to enhance the presentation of the information of your page; first you can add html directly on the editor, second you could use a style, and third you could use blocks. For example, this page uses the link grid block and carousel block to display some of the page's information.
Let's see how we can add the carousel above to your page. First add a markdown fenced block with the address of the block that you wish to use, in our case that address will be :
```@nitoku.public/carousel
```
As you can see, we use the address of the block as the identifier in your markdown fenced block. That identifier will be used by the platform to run the specific block.
The second part of using a block is to configure the block with the data that we need to display our information. In the case of the carousel, that data will be the images that we want to include on our carousel. You can see the configuration data of this carousel block below:
```@nitoku.public/carousel
max-height : 700
max-width : 700
autoplay: true
autoplay-speed: 5000

// graph video
image :  https://www.nitoku.com/file/@nitoku.design/nitoku.public-files/mg8diorzw0q78bs.gif
link : https://www.nitoku.com/@nitoku.public/graph

// gitter chat
image : https://www.nitoku.com/file/@nitoku.design/nitoku.public-files/0qunrd7a3g160gq.png
link : https://www.nitoku.com/@nitoku.public/gitter

// table
image : https://www.nitoku.com/file/@nitoku.design/nitoku.public-files/iqvr37k4a9p9lwa.png
link : https://www.nitoku.com/@nitoku.public/datatables

//calendar
image : https://www.nitoku.com/file/@nitoku.design/nitoku.public-files/mqwkskie9naddu5.png
link : https://www.nitoku.com/@nitoku.public/fullcalendar

//html code video
image : https://www.nitoku.com/file/@nitoku.design/nitoku.public-files/2h72656yy34xxw4.gif
link : https://www.nitoku.com/@nitoku.public/code

//text editor
image : https://www.nitoku.com/file/@nitoku.design/nitoku.public-files/r8nb2ix53ijxhac.gif
link : https://www.nitoku.com/@nitoku.public/editor

//countdown video
image : https://www.nitoku.com/file/@nitoku.design/nitoku.public-files/fvpfq924gj1b52w.gif
link : https://www.nitoku.com/@nitoku.public/countdown

//gantt diagram
image : https://www.nitoku.com/file/@nitoku.design/nitoku.public-files/hmfn8naof8kqh5h.png
link : https://www.nitoku.com/@nitoku.public/gantt
```
The configuration data for each block is specific to that particular block and is usually described on the block page, in the case of the carousel the code of the block and the description of the block configuration is at : https://www.nitoku.com/@nitoku.public/carousel.
That was the basics about using blocks. As your next step on your Nitoku journey, maybe you want to use other blocks, there are plenty open source and free blocks available, You can see a list of popular blocks here.
6. Create a team.🔗
Up to now, all the data that you have created resides on your personal pages and is private to you. You can't share private pages, only you have access to them.
If you want to create information to be shared with other Nitoku users, you need to create a team, teams can be public or private. On public teams the information that you publish will be accessible to everyone and on private teams the information of that team will be available only to users that you invite to your team.
Now, go to your public teams tab and create your first public team by clicking on the "Create a new public team" icon.
Adding information to your team is similar to the way we have used above to add information on your private pages. After you create your team, you will see a box with the information of your new team, click on the link inside the box to display the team page, then e.g. to add a new page, click on the data tab and add your new page. You can see a example of this last step below.
If you want to know more about teams, follow this link.